The content in this post is accurate if you’re on .NET 5; however if you’re on a later version you should check out the sequel for .NET 6 and up.
Enclave creates encrypted connections between networked systems. Our socket implementation aims to move as much data as possible for the lowest CPU cost. In practical terms, we want to avoid consuming CPU cycles but get as close as we can to line speed in terms of throughput.
The preferred transport Enclave uses to build encrypted tunnels between systems is UDP; falling back to TCP if UDP communication is not possible.
Enclave operates at Layer 2 (carrying Ethernet frames across tunnels). Unreliable UDP datagrams are the preferred transport for tunnelled traffic because it’s highly likely that tunnels will themselves carry encapsulated TCP traffic. Carrying encapsulated TCP traffic inside a TCP connection can lead to a mismatch of timers, such that upper and lower TCP tunnels mismatch creating a situation where the upper layer can queue up more retransmissions than the lower layer process adversely impacting throughput of the link. For a more in-depth explanation of the TCP over TCP problem, see Why TCP Over TCP Is A Bad Idea by Olaf Titz.
So, what are our requirements for our UDP sockets in the Enclave world? Basically, there are three:
- Achieve as close to line speed as possible when sending and receiving.
- Try to use processor time efficiently and not waste cycles.
- Sustain large numbers of concurrent UDP sockets.
The guide below outlines how our C# UDP socket implementation comfortably saturates a 1Gbps connection and keeps CPU usage to a minimum.
If you want to jump ahead, the complete working example code is available in our github: https://github.com/enclave-networks/research.udp-perf. You can also just jump to the results below if you wish.
The Fundamentals
Ok, so with our requirements in mind, what are the basic guiding principles we are going to apply to get the best possible performance out of our sockets?
Use Asynchronous IO
It’s relatively well known now (especially with all the async/await behaviour in .NET) that to achieve a significant amount of concurrent socket IO, you need
to be using Asynchronous IO.
The basic concept is that rather than initiate an IO operation and block the thread until it completes, with async IO we initiate an IO operation and get told (possibly on a different thread) when that operation completes. This reduces thread usage, and stops us exhausting the .NET thread pool when we have a lot of sockets.
On Windows, Asynchronous IO is presented via IO Completion Ports (IOCP), and on Linux through the epoll interface.
Luckily, all these platform-specific mechanics are entirely abstracted away for us by the .NET Runtime. However, using the asynchronous functionality in .NET Sockets in the ‘right’ way is really important when you’re trying to squeeze out all the performance you can.
As well as large amounts of concurrent IO, if done correctly async IO can also achieve very high throughput to/from a single endpoint, as we’ll see very shortly.
Avoid Copying Data
We want to avoid copying data to and from buffers whenever possible. This means no taking copies of data before processing received data, and no creating new byte arrays to get one the right size!
It’s much easier to avoid copying byte arrays these days thanks to the Memory<byte> and Span<byte> types that let you represent ‘slices’ of memory without
re-allocating anything:
Old unpleasantness with a new byte[] allocation:
1
2
3
4
5
var recvBuffer = new byte[1024];
int bytesRead = ReceiveSomeData(recvBuffer);
var actualReceived = new byte[bytesRead];

Array.Copy(recvBuffer, actualRecvd, bytesRead);
New goodness:
1
2
3
4
5
Memory<byte> recvBuffer = new byte[1024];
int bytesRead = ReceiveSomeData(recvBuffer);

// No allocations to get a subsection of the buffer.
var actualReceived = recvBuffer.Slice(0, bytesRead);
Avoid Allocating Memory
When you’re trying to squeeze every last bit of CPU time, it’s worth trying to avoid allocating objects and memory from the heap where possible. This avoids both:
- The time it takes to actually allocate objects; the GC is fast, but allocating a new object from Gen0 still takes some time.
- Reduce GC pressure. The more you allocate, the more the GC has to clean up; again, this process is fast, but still consumes CPU time.
.NET 5 has a lot of options to help with this, but one of the features that helps us the most when we’re doing our async IO is the availability of ValueTask and IValueTaskSource, which avoid allocations (as opposed to Task and TaskCompletionSource).
The Implementation
Let’s look at the .NET Socket’s ReceiveFromAsync method first. The one we want takes a SocketAsyncEventArgs argument.
1
public bool ReceiveFromAsync(SocketAsyncEventArgs e);
Now, you’ll note that this method doesn’t return a Task or ValueTask, despite having the Async suffix. That’s because the SocketAsyncEventArgs structure is a low-level structure for working with asynchronous IO.
The structure implements an OnCompleted method that can be overridden, and is called when an IO operation completes.
The existing TCP socket method overloads SendAsync and ReceiveAsync, that take ReadOnlyMemory<byte> buffers and do return a ValueTask, wrap a runtime-internal derived version of SocketAsyncEventArgs called AwaitableSocketAsyncEventArgs, that invokes the appropriate continuation when IO completes.
The runtime doesn’t currently have support for UDP versions of those TCP methods, so I’m going to create a new class, UdpAwaitableSocketAsyncEventArgs, for our needs!
UdpAwaitableSocketAsyncEventArgs and IValueTaskSource
Follow along in my
UdpAwaitableSocketAsyncEventArgscode.
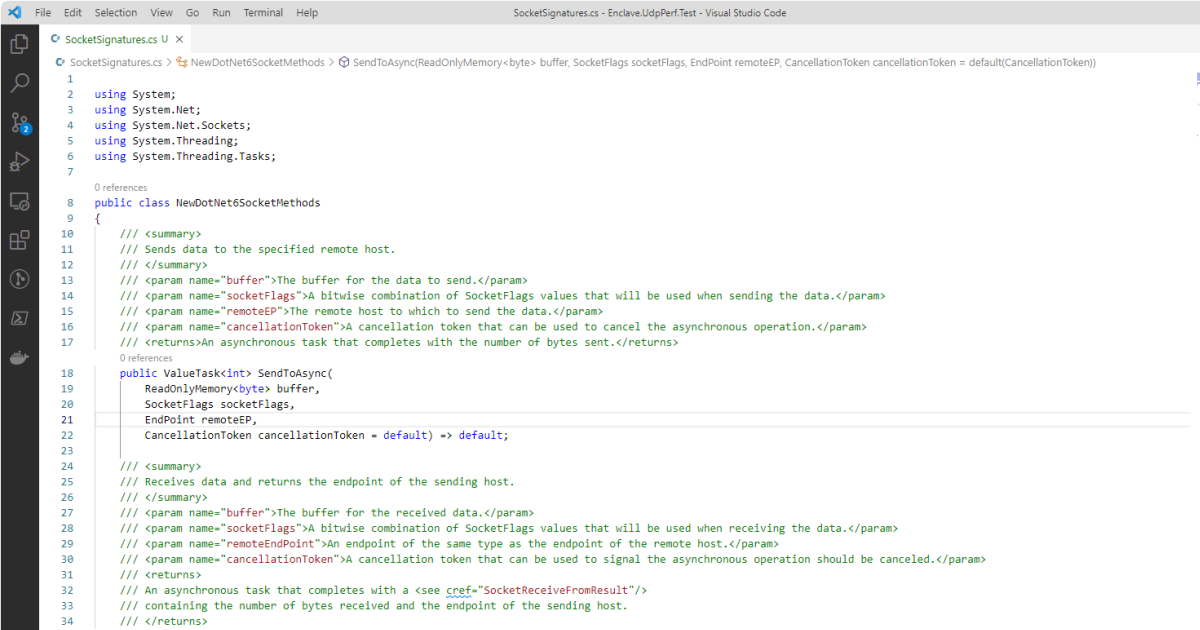
Ok, so we want to create a method similar to TCP’s SendAsync or ReceiveAsync, but for UDP, so SendToAsync and ReceiveFromAsync.
One thing you may notice (and I mentioned earlier) is those existing methods return a ValueTask rather than a Task. This goes back to what I was saying earlier about reducing allocations. ValueTask is a struct rather than a class and, when combined with IValueTaskSource prevents any allocations when awaiting on the result of an operation.
There are excellent blog posts on IValueTaskSource by more learned people than myself, but the basic concept is that you create a class that implements three methods:
GetStatus: Checks the status of theValueTask(Pending, Succeeded, Faulted, etc.)GetResult: Gets the result of the operation (e.g. if you are usingValueTask<int>, you’d return anintfrom this method).OnCompleted: This is the chunky one; this method is called when someone usesawaiton yourValueTask, and it’s responsible for invoking the provided continuation parameter when our asynchronous operation completed.
You can sort of see how SocketAsyncEventArgs and IValueTaskSource come together when we implement IValueTaskSource on our derived UdpAwaitableSocketAsyncEventArgs class:
- The
SocketAsyncEventArgsclass gives us anOnCompletedmethod that gets called when our async IO operation completes. IValueTaskSourcelets the runtime tell us what callback to invoke when our IO completes.
In our code we provide DoReceivedFromAsync and DoSendToAsync methods to wrap the async operation and return a ValueTask<int> backed by our UdpAwaitableSocketAsyncArgs to tell the ValueTask when it’s done.
In my example implementation, I have explicitly avoided preserving Async ExecutionContext, mostly to make the code easier to understand, but also because I do not need to preserve the context, and there are performance gains to be had by not preserving it. There’s a link in my code example to where you can find a full example in the dotnet runtime that does preserve Async ExecutionContext, if you need it.
Pooling UdpAwaitableSocketAsyncEventArgs
One thing you’re going to want to avoid is new-ing up an instance of UdpAwaitableSocketAsyncEventArgs every time you do IO. This is partly due to wanting to avoid allocations (remember how keen I am on that?), but mostly because the act of creating a new instance is very expensive from an operating system perspective.
On Windows at least, inside SocketAsyncEventArgs is an instance of a PreAllocatedOverlapped structure that caches the expensive-to-create NativeOverlapped operating system structure. So, if we create new instances of UdpAwaitableSocketAsyncEventArgs every time, we are not taking advantage of that cache.
Inside the dotnet runtime, the Socket class has got a local cached instance of AwaitableSocketAsyncEventArgs that the Socket class uses whenever possible to avoid
creating new ones.
We can’t add anything to the Socket class obviously, so it’s Microsoft.Extensions.ObjectPool to the rescue! This nuget package gives us a convenient ObjectPool type which efficiently manages a pool of objects, allocating new ones when required, but aiming to re-use the ones we already have.
I’ve defined extension methods in UdpSocketExtensions that uses a shared pool of objects across all in-use sockets, and gives us two familiar-looking extension methods:
1
2
ValueTask<int> SendToAsync(this Socket socket, EndPoint destination, ReadOnlyMemory<byte> data);
ValueTask<SocketReceiveFromResult> ReceiveFromAsync(this Socket socket, Memory<byte> buffer)
These methods get an instance of UdpAwaitableSocketAsyncEventArgs from the pool, await on either the DoSendToAsync or DoReceiveFromAsync method, and use a finally
block to return the instance to our pool.
That’s it, we’re done!
The Pay-Off
Okay, so it’s all well and good going on about allocation-this, and ValueTask-that, but what do we get for our efforts?
Here’s some very basic performance tests where I send data across a gigabit link, and monitor the CPU usage as I do so.
My machine for testing has a 12-core Intel i7-9750H@2.60GHz powering it (for reference).
You can run these tests yourselves using the Enclave.UdpPerf.Test project in the linked GitHub repo. You may need to disable/reconfigure your firewall on the receive side.
Big Packets
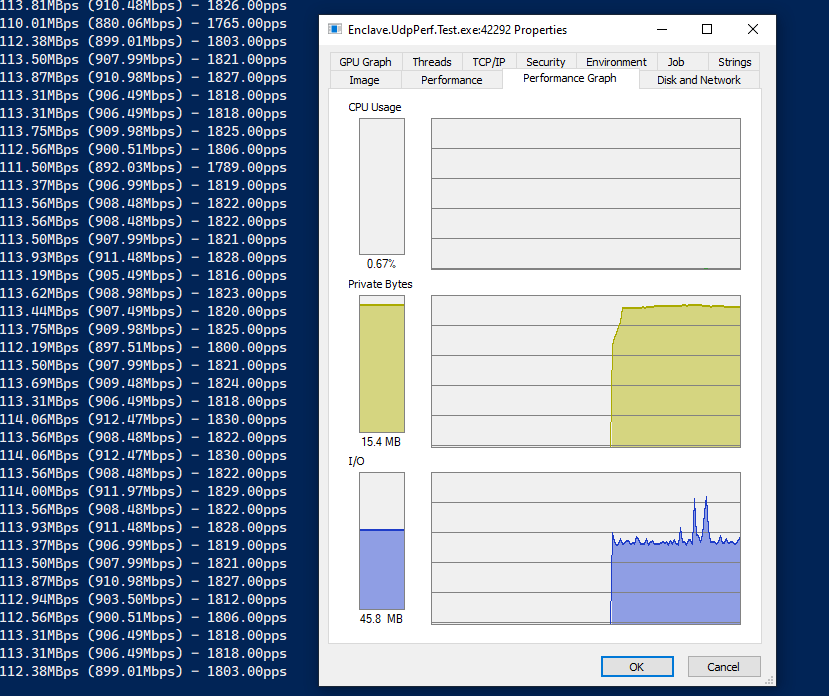
First up, send performance, with 65k packets:
… and receive performance, on the same machine, 65k packets:
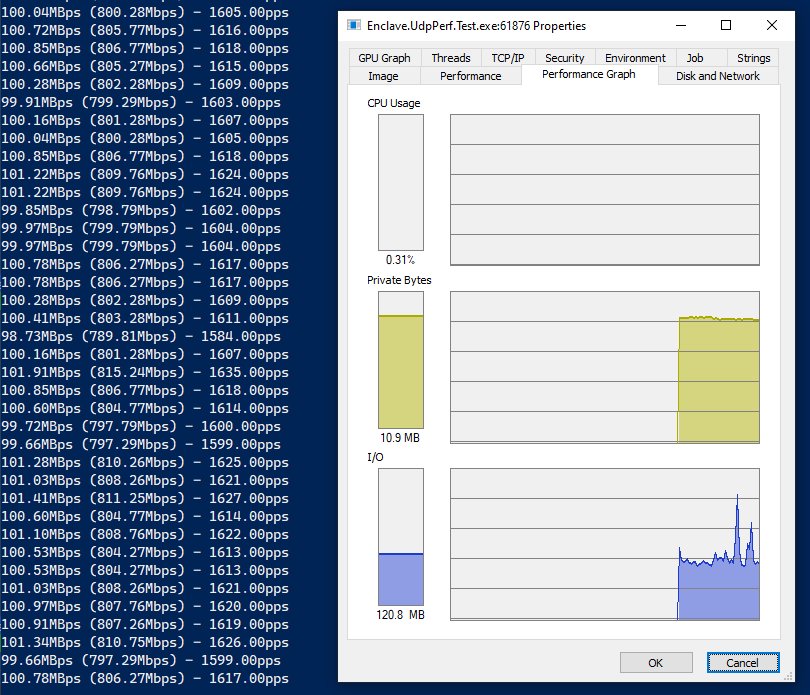
So, you can see that we’re averaging around 900Mbps on the send, and 800Mbps on the receive. Processing around 1800 packets-per-second. The drop in receive rates is most likely UDP packet loss over the link, or buffers on the receive side getting full.
Importantly, the CPU is barely ticking over, and our memory stays flat at about 15MB.
Small Packets
Let’s bring the packet size down to a realistic small packet size, to fit in a single Ethernet frame, so about 1380 bytes of data in each UDP packet. We should be able to fit a lot more packets over the link at that size, so let’s see with send performance first:
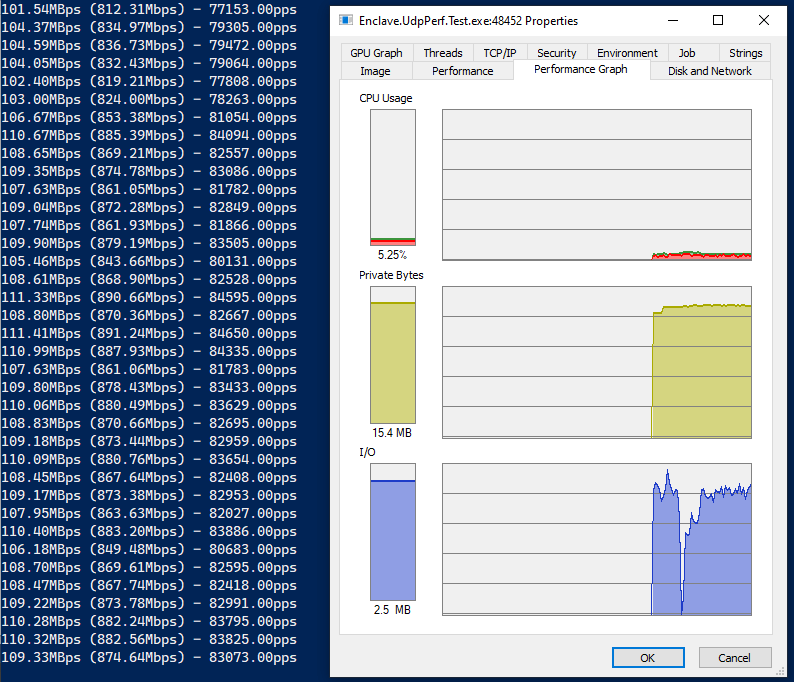
…and receive, on the same machine, 1380 byte packets:
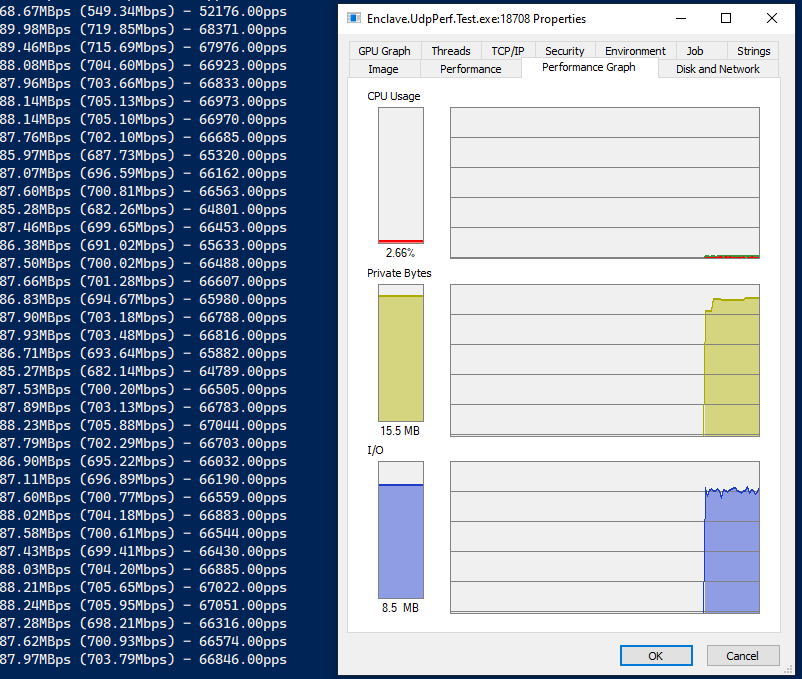
Look at those packet-per-second numbers! We’re up to around 82,000 packets per second, and we’re still only using about 5% of the overall CPU, and the receive side is even lower! Great stuff.
Remaining Allocation Frustration
There’s only one thing that eludes me with this solution, and it is that we are so close to being completely allocation-free on the send and receive paths, but we aren’t quite. There are still objects allocated during the receive path, but who’s the culprit?
Profiling shows us that an IPEndPoint instance is needed for each result of ReceiveFromAsync, to contain the source of the packet we received. Since IPEndPoint
is a class, it has to be new-ed up every time, which is the source of our allocations. At some point if would be nice to see a struct version of IPEndPoint that might help us cut back on the few remaining allocations.
Wrap-Up
Hopefully this gives you some tips for using high-performance UDP sockets (and perhaps IO in general) in your app. As linked at the start, you can grab all this code on our Github: https://github.com/enclave-networks/research.udp-perf/tree/dotnet5.