We’re excited for a big Enclave Agent release today, v2021.11.02, which comes with a broad set of new features, both in the installed Enclave Agent, and in the overall Enclave platform.
You can update to the new version of the Enclave Agent now; how you do that depends on your platform:
-
On Windows: To update to the latest version on Windows, you can click the upgrade prompt in the Enclave Tray app, or you can download
v2021.11.02directly from https://release.enclave.io/enclave_setup-2021.11.2.0.exe. -
On Linux: To update on Linux check out our documentation pages for upgrade instructions.
-
On macOS: On macOS, run
brew upgrade enclaveto get the latest version.
This release has involved a huge amount of effort across the team for a few months, and we’re super proud of what we’ve built. I had to write a blog post just to go through all of the features!
No idea what Enclave is? We create zero-fuss, zero-trust network connectivity between systems anywhere on the internet, without opening any of your firewalls, adding edge devices, or changing your infrastructure. It’s also free to try out at https://enclave.io
Receiver Access Controls
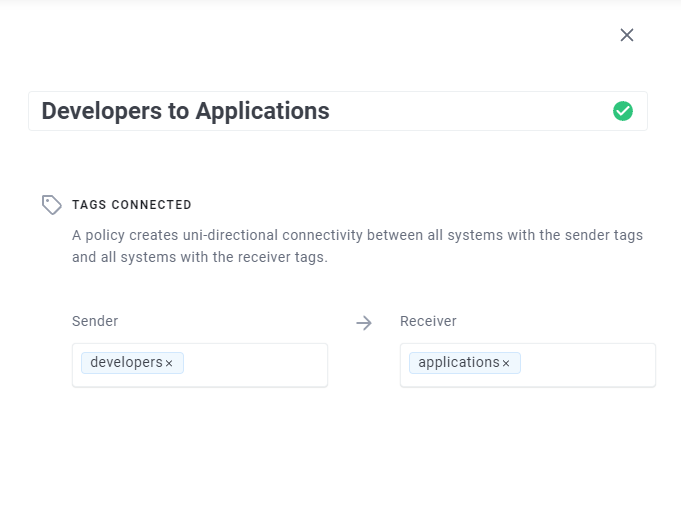
Before v2021.11.02, when you created a policy in Enclave, you could define a Sender and Receiver in the policy to control who can talk to each other:
However, as of today, you can now also specify what traffic is allowed to flow by specifying rules for Protocols/Ports you want to allow in the policy:
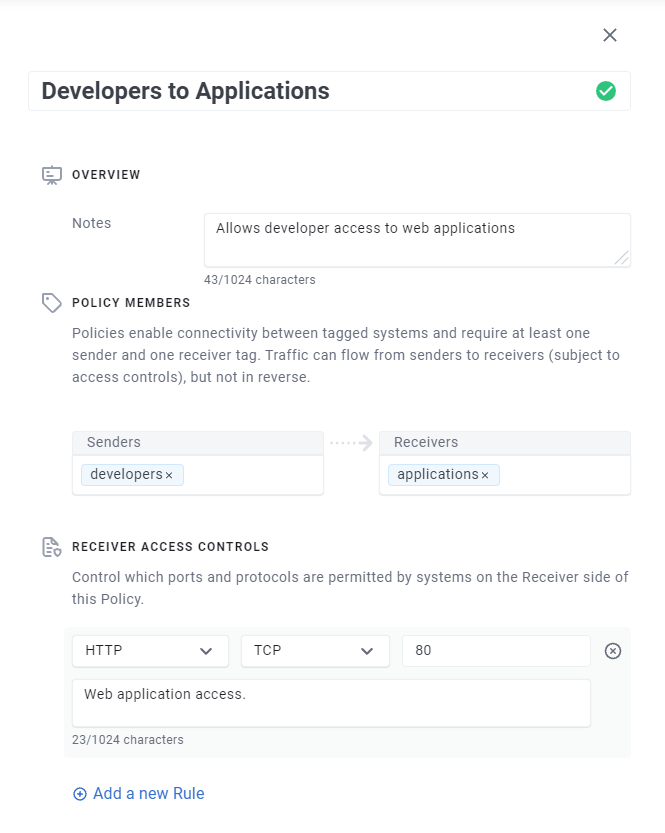
Enclave always applies Access Controls at the Receiver side of a policy which makes the entire system much easier to reason about. You can set up traffic rules in a similar way to setting up firewall rules to allow access to a service. The way rules are applied should feel pretty intuitive, but fundamentally:
- If you don’t specify any rules on your policy, no traffic will flow (default deny)
- Each ACL rule only applies to connections between the senders and receivers of the policy where it was defined.
- Different rules on different policies affecting the same systems are combined, but still respecting rule #2.
Access Controls take effect just as quickly as other policy changes, so traffic will be allowed or denied as soon as policy is changed.
Don’t forget, as with everything else in Enclave, you can configure Access Controls via the API:
1
2
3
4
5
6
# Update a policy to only permit HTTP traffic to be received.
$ curl --oauth2-bearer $token \
       -X PATCH
       -H 'Content-Type: application/json' \
       -d  '{"acls": [ { protocol: "Tcp", ports: "80" } ]}' \
       https://api.enclave.io/org/{orgId}/policies/{policyId}
Ephemeral Enrolment Keys
For some time, Enclave has supported Kubernetes and Docker use-cases ‘out-of-the-box’, through the use of our docker container, enclavenetworks/enclave.
1
2
3
4
5
$ docker run --rm \
             --cap-add NET_ADMIN \
             --device /dev/net/tun \
             -e ENCLAVE_ENROLMENT_KEY='XXXXX-XXXXX-XXXXX-XXXXX-XXXXX' \
             enclavenetworks/enclave:latest
However, up until now, once the pod/container stopped, that system would continue to remain enrolled and use up a seat in your account until you removed it. This wasn’t ideal for automation scenarios where you might want to spin up and terminate containers without having to manually remove those containers afterwards.
By their very nature, containers are temporary, or Ephemeral. So, their enrolment in your Enclave organisation should behave in the same way.
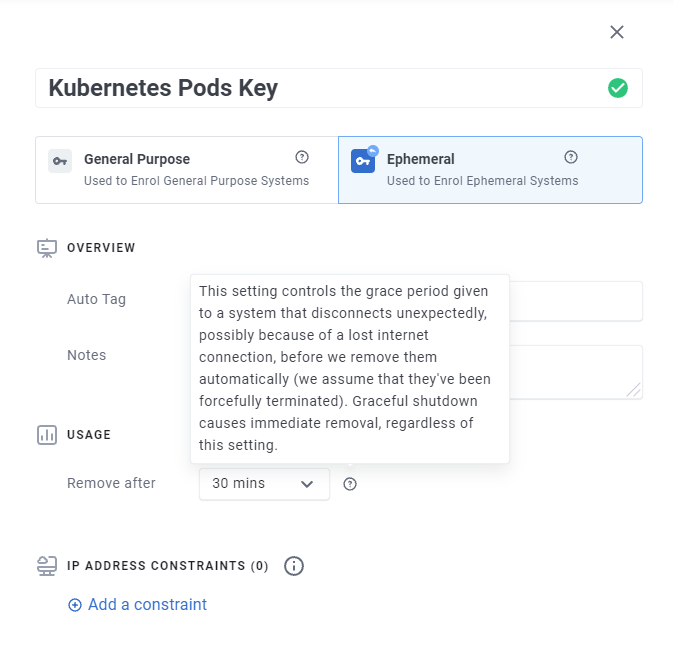
As of now, you can define Ephemeral Enrolment Keys in your Enclave Organisation which will cause containers to be automatically removed from your account once terminated.
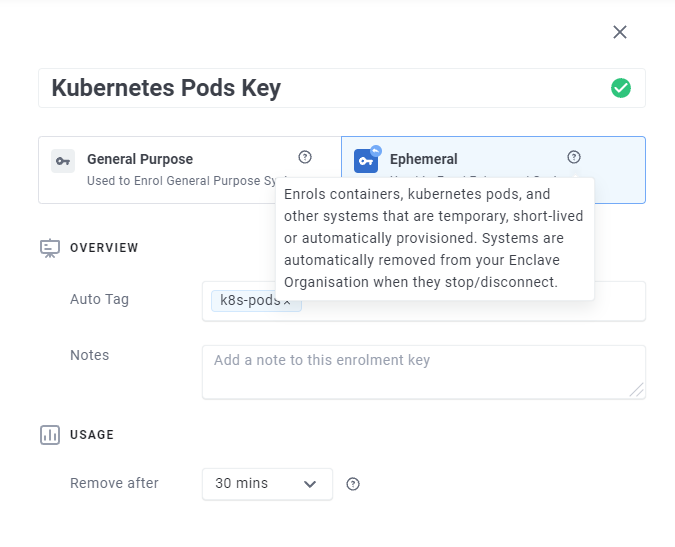
Now, when you enrol a system, pod or container using an Ephemeral Enrolment Key, that system will only remain enrolled to your Enclave Organisation until the container stops running.
In practical terms, when the container stops gracefully and disconnects from our platform, it will be immediately revoked from the Organisation, freeing up space for new systems.
Why did I put gracefully in italics? Well, if you’re running Kubernetes in a home-lab scenario, and someone trips over a network cable, your systems will disconnect (time out) from our perspective, but because this is an unexpected disconnection, we don’t remove the system instantaneously (otherwise when network connectivity was restored your containers wouldn’t connect to the Enclave network again).
Instead, each enrolment has a “grace period” defined for systems (configured per Enrolment Key) that determines how long after an unexpected disconnect we should allow the ephemeral system to remain enrolled to your account.
In practice we recommend 30 minutes as a good default, but you should align the interval to your use-case and availability expectations of your system.
In-Memory Profiles
When running Enclave interactively or inside a docker container and using an ephemeral Enrolment Key, the profile for that system (including private key material and certificate) is no longer written to disk but remains solely in-memory.
This is preferable to persisting a profile file to disk (i.e. /etc/enclave/profiles). By acknowledging that a system isn’t intended to have a sense of permeance, persistent storage of the profile is also no longer required, even for systems which are only enrolled temporarily. Depending on the threat model you’re working with, you may find that in-memory profiles can also help to reduce the risk of key material being exfiltrated from a compromised system.
Notes Everywhere!
When we released our Managed DNS feature earlier in the year, we included a free-text notes field with every DNS Zone and DNS Record. We got feedback that having a free-text field like this is super useful for recording any associated reasoning and change control notes for a variety of entities in your Enclave Organisation, so we’ve added ‘notes’ fields to:
- Enrolment Keys
- Systems
- Unapproved Systems
- Policies
Notes can hold up to 1024 characters of free text and as well as adding notes in the portal, you can of course also set notes via the API, just like any other field:
1
2
3
4
5
6
# Set a note describing why this policy was created and who requested it
$ curl --oauth2-bearer $token \
       -X PATCH
       -H 'Content-Type: application/json' \
       -d  '{"notes": "Some free text"}' \
       https://api.enclave.io/org/{orgId}/policies/{policyId}
API Docs Improvements
We’ve made some improvements to our API docs too, both to make them more consistent with the rest of our visual styling, but also to make it easier to interact with our APIs.
You can now authenticate with our API using your existing Enclave Portal account and try out the APIs using those credentials. You can still use a Personal Access Token to try the APIs if you wish.
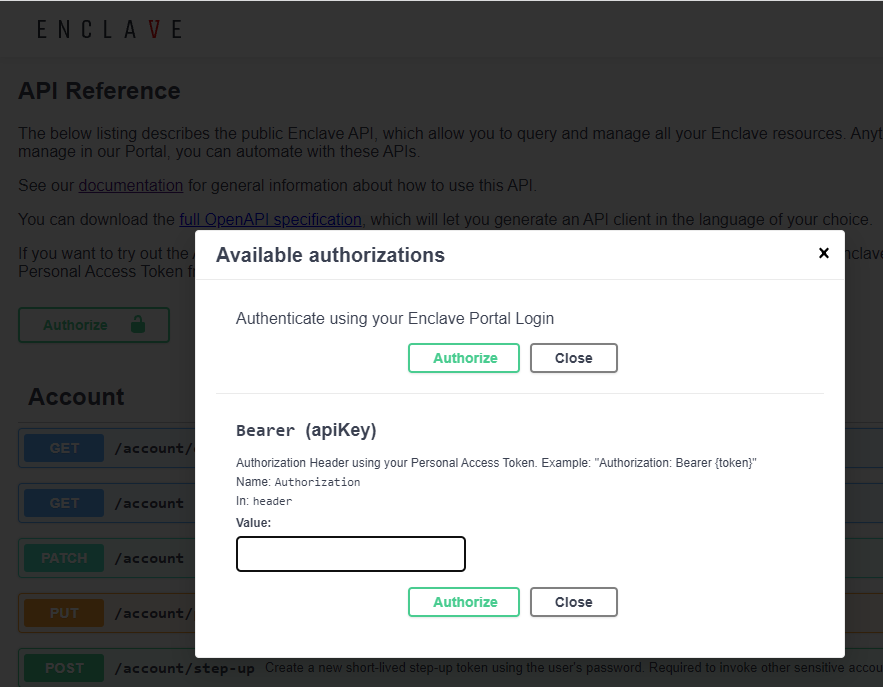
The login you get only lasts a limited time, so if you get 401 responses after a while, just open the Authorize dialog to log out and back in again.
Windows Tray Information
We have introduced a minor update into the Enclave Tray application on Windows to make it easier to figure out why your Enclave instance may not be operational.
If you enrol a system via the Windows Tray application, but that system requires manual approval in the Enclave Portal, a warning will now be displayed, with a link to the portal.
Equally, if you remove a system from your account in the portal or via the API, this will be reflected in the tray of that system.
CLI Updates
We’ve made several updates to the Enclave CLI to make it easier to use Enclave:
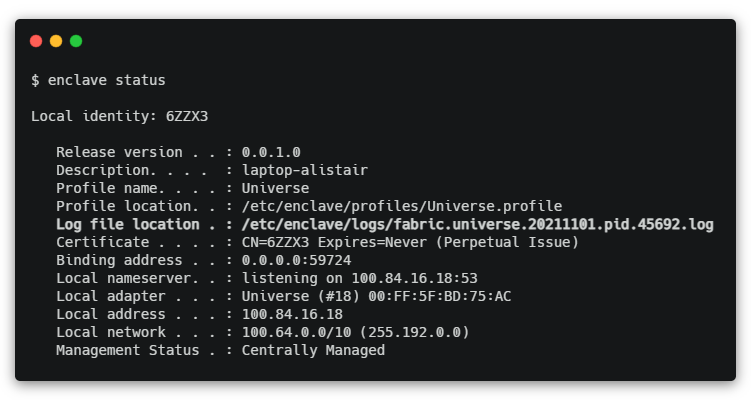
Log File Info
The enclave status command now prints out the log file which Enclave is currently writing to.
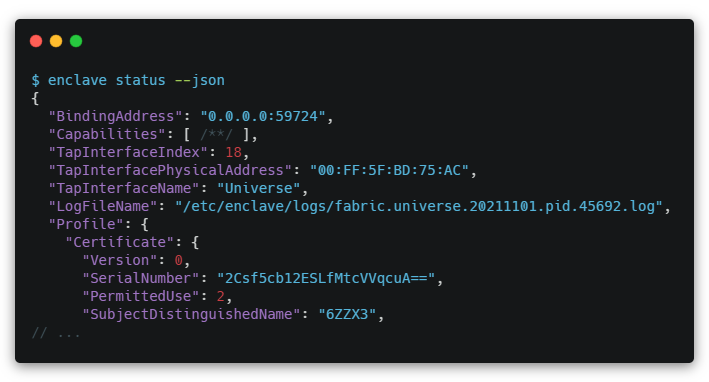
Status Verb accepts –json argument
You can now pass --json to enclave status to collect status output in JSON.
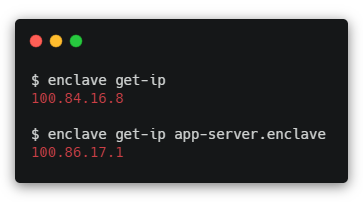
Get-IP verb
We’ve added a new verb to the Enclave CLI, get-ip. This allows you to either get the Enclave IP of the local system (handy for configuring DNS nameservers), or to resolve the IP of a remote peer (by specifying the peer DNS name or system ID as an argument).
Enclave Restart
Last, but certainly not least, we’ve added the enclave restart verb, which is the equivalent of running enclave stop, then enclave start, but in a single command.
The restart verb also has more resilience in it to retry the start operation should the first attempt fail for any reason.
This means should you need to restart Enclave on a remote system when you’re connected in over RDP or SSH running over an Enclave tunnel, you have a predictable mechanism to restart the Enclave service without accidentally stopping the service and then losing the connection to the server which you would have used to restart it.
Support
If you have any questions/issues with the new features, please head over to our community forums at community.enclave.io or join us on Slack at https:/enclave.io/slack.
Happy networking!